Saturday, July 29, 2006
#3 Strung up "in the white"

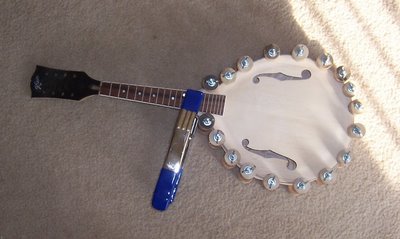
 I just strung this one up and she sounds great. Better than my first one I built, I think. VERY LOUD, and maybe a little better bass, with balanced ringing highs. It's strung up with a rosewood bridge and plastic nut, so it sounds a little tinny like my first one did, but that will go away when I set up the bone nut and ebony bridge. I decided to not bind the headstock or the back, I think it looks great without. I'm happy with this headstock shape. The action is a good bit too low right now which is fine, since the bridge is set pretty low. I think the ideal action will be with the bridge set about 40% from all the way up, which is pretty danged good. Now I'll need to carve the bone nut, set up the bridge, and get #2 caught up to this one.
Thursday, July 27, 2006
Back glued on #3 mandolin

I glued the back on using my newly made spool clamps, they are a big improvement over using half a dozen assorted bar clamps, C clamps, etc. There's a much better chance of getting a uniform glue joint all the way around. Last night I glued the labels in all 3 of the mandolins I'm working on. I used hide glue which is what a lot of builders use for gluing labels, but it was enough of a pain that I'll probably be using Titebond wood glue from now on.
Sunday, July 23, 2006
Unproductive Weekend

I attended a mandolin workshop Saturday 12-3, then my band had a gig Saturday night, and today (Sunday) I met my folks for a few hour visit as they were passing through on the way to visit my grandmother in Virginia Beach, so I didn't really get anything done, except what you see here in the picture. I had a coupon for Lowe's that expired today, so I bought a 36" oak dowel that's 1 1/4" in diameter, some 1/4" x 5" long carriage bolts(18 count), a box of washers, and a box of wing nuts. I now have 18 spool clamps like they sell in the Stew Mac catalog, for a good bit less money. They did take a few hours to make, however.
Friday, July 21, 2006
Neck glued on #3
Thursday, July 20, 2006
Top binding and binding next to neck joint

With these kits, I've confirmed that binding the top before attaching the neck is the best way to do it, no doubt. Here's a pic of the binding glued on, and trimmed to fit the angle of the neck joint. It doesn't get any closer than this. By the way, I couldn't tell if I was going to like the black/white binding, but now that I've shaved it down flush with the top, I like it a lot. I might even do the F style I'm working on with the same binding.
Wednesday, July 19, 2006
Attached top binding on both #2 and #3

Tonight I finished routing and cleaning up the top binding channel on both mandolins, as well as actually gluing the binding on both. Wow, talk about another step that went MUCH smoother than on my first mandolin build. It gave me fits. The difference? On my first, I did the top binding after the neck was already attached, which is what most people do. Where the neck joins the body is very tricky, and I didn't do a very good job of routing the binding channel there, or cutting the edge to meet the neck cleanly. In doing it before I attached the necks on these, I have overlap into the neck joint area that I'll be able to trim perfectly before attaching the neck. MUCH better process, I don't know why this isn't the standard method. Here's a pic of one of them with the binding glued on. Oh, and another thing I learned with my first one, the tape can "tear out" the spruce, so I stick the pieces of tape on my jeans before using it to get rid of some of the stickiness.
Inlay finished

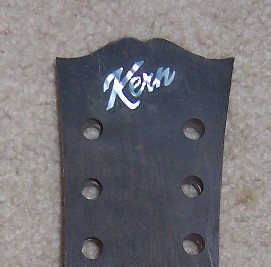
I've finished the inlay on 1 of the 2 mandolins. I'm proud of this new logo, it is a huge improvement over my efforts on the first mandolin I built. This pic also shows the headstock shape, which is also greatly improved over my first mandolin.
Saturday, July 15, 2006
Headstock bandsaw jig pic
Headstocks, etc.

I spent literally all day working on mandolins, or mandolin building tools. First, using my new drill press, I made a neck holding jig for my bandsaw that holds the neck horizontally so headstock cuts will be parallel to the neck instead of parallel to the headstock angle, which would be what you would have if you didn't use a jig like this. Confusing? Yep. Look at the picture, it might make more sense.
I put it to good use right away, I traced the top shape I wanted to use onto the headstock, and cut out the shape the best I could on the bandsaw. I'm realizing more and more that I really need to do some setup work on my bandsaw. It's not as precise as I need it, so the headstocks have required quite a bit of work for me to get them looking good. They aren't going to look as good as I know they could with a properly set up bandsaw, but they will look better than my first mandolin headstock, so I guess I'll have to be happy with that for now.
Once again I used my drill press, this time to drill the holes for the tuners. I used a plywood backing board, and my drill bit that has been modified to help prevent tear-out, and the results were absolutely perfect. With my first mandolin, I used a hand drill, and even with a backing board, I had horrible tear-out on the ebony overlay. Bad enough that I actually had to glue pieces back in place. Very cool.
I then cut the nut slot at the top of the fretboard, and also cut the truss rod channel, using my Dremel and a cutting bit.
The last task at hand for my almost 13 hour mandolin building day was to glue the mother-of-pearl logo onto the headstock with Duco cement. Once this dries overnight, I'll be able to scribe around the letters with my very sharp scribing tool that was made just for this, and then use my Dremel and router base to route out the inlay channel, and go ahead with finishing the inlay process. I should be able to do all that tomorrow.
**Don't let the rough shape of the headstock scare you, the ebony overlay still has to be trimmed to it's final shape, and the top shape of the headstock has to be cleaned up a little bit.
Monday, July 10, 2006
Pearl carving

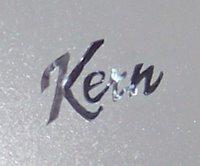
I settled on a new font for my headstock logo, and spent much of this past weekend cutting out pearl. This one is of course much more difficult to get right without breaking it, but I think the results are worth it. Here's one that has been cut out, it's black from the Sharpie marker that I'm using to transfer the logo to the pearl. I've been using pencil, but it smudges off too easily. when you're handling the piece you're cutting. The Sharpie will sand off easily after the logo has been set in the ebony. The one pictured here has been cut but the edges still have to be smoothed with my needle files.
Look for more regular updates on this blog in the next few weeks.


